- Proxy RADIUS
Proxy RADIUS enables your RADIUS server to forward authentication requests from a PortMaster or other network access server (NAS) to a remote RADIUS server and to pass the reply back to the NAS. This feature enables cooperating Internet service providers (ISPs) to handle dial-in service requests from each other's users. Corporate users can easily forward packets from local to remote networks.
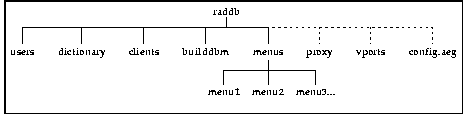
You create a proxy file in the /etc/raddb directory on the forwarding server and, if necessary, on the remote server. Each line in the proxy file contains the hostname or IP address of a remote server, the secret shared between the forwarding server and the remote server, and the realm of the remote server in the proxy chain. Each entry can specify the ports the remote server uses for RADIUS authentication and accounting as well as certain keywords to affect server behavior.
Note ¯  Usernames with an embedded at sign (@ ) are treated as proxy realms.
- iPass protocol support
The iPass protocol enables you to provide global roaming Internet access. To use iPass with RADIUS 2.1, you must do the following:
a. Register at the iPass, Inc. website, http://www.ipass.com/ .
b. Add the keyword ipass to the entries of the appropriate remote servers in your /etc/raddb/proxy file.
c. Run iradiusd instead of radiusd .
Note ¯  If you run iPass and ActivCard or Securid, for configuration information send email to support@livingston.com .
- ActivCard support
RADIUS now supports ActivCard authentication on the following platforms supported by ActivCard 2.1: AIX, HP-UX, Solaris, and Sun-OS. ActivCard authenticates users by means of dynamic passwords generated by a handheld token using the public Digital Encryption Standard (DES) algorithm. The RADIUS server can forward all requests specified by the user profiles to the ActivCard server. Perform the following steps to enable user authentication via ActivCard:
a. Install the ActivCard server on either the same host as the RADIUS server or on a different host.
b. Create the file /etc/raddb/config.aeg on the host where the RADIUS server resides.
c. Specify Auth-Type = ActivCard as a check item in the user profiles of all ActivCard users.
d. Run the daemon sradiusd instead of radiusd .
- Accounting signatures required
RADIUS 2.1 strictly complies with RFC 2139. The server discards unsigned accounting packets--packets with invalid request authenticator attributes--and logs an error message. If you want to use RADIUS accounting, you must run RADIUS 2.1 with ComOS 3.3.1 or later. You can use radiusd -o to run RADIUS 2.1 if you have noncompliant RADIUS clients. In this case, RADIUS logs unsigned accounting records and flags them with Request-Authenticator = None.
- Virtual ports
You can restrict the number of logins permitted to specified telephone numbers.
a. Install the RADIUS accounting and authentication servers on the same host.
b. Create the file /etc/raddb/vports with the format shown in the following sample file:
# Called-Station-ID Number of logins permitted
9255550020 20
9255550021 30
9255550022 25
c. Issue the command radiusd -s to run the server in single-thread mode.
Note ¯  The virtual ports feature does not provide an exact control. Logins that occur before radiusd starts running are not considered in the count. Accounting records that are sent to the backup accounting server are not considered in the count. This feature cannot provide simultaneous login limits for individual users because it is based on Called-Station-Id rather than Calling-Station-Id.
- Vendor-specific attributes
RADIUS 2.1 supports RFC-compliant vendor-specific attributes, including the two new Lucent InterNetworking Systems attributes introduced in ComOS 3.8: LE-Advice-of-Charge and LE-Terminate-Detail.
The LE-Advice-of-Charge value is a string included in RADIUS accounting stop records generated by ComOS 3.8 or later. This string provides any advice-of-charge information passed along by the telephone company on the ISDN D channel.
The LE-Terminate-Detail value is a string included in RADIUS accounting stop records generated by ComOS 3.8 or later. This string provides a detailed description of the reason the session terminated.
The RADIUS 2.1 dictionary file uses the following syntax to define vendor-specific attributes that conform to RFC 2138:
#
# Vendor-Specific attributes use the SMI Network Management Private
# Enterprise Code from the "Assigned Numbers" RFC
#
VENDOR Livingston 307
# Livingston Vendor-Specific Attributes (requires ComOS 3.8 and RADIUS
s# 2.1)
ATTRIBUTE LE-Terminate-Detail 2 string Livingston
ATTRIBUTE LE-Advice-of-Charge 3 string Livingston
- Alternate password file
You can run radiusd -f Filepath to specify a password file other than /etc/passwd .
- Address binding
You can force the RADIUS server to bind to a specific IP address to listen for requests by running radiusd -i Ipaddress. You might find this useful if you are running RADIUS on a multihomed host or a host with a virtual IP address.
Note ¯  When using hosts that are multihomed or that have virtual IP addresses, remember RADIUS clients ignore replies that do not originate from the primary or secondary RADIUS server specified on the client.
- Improved messages
The syslog message for many kinds of rejected access-requests now includes the Calling-Station-Id--if known--enabling you to track down where the failed login attempts are dialing from. Here is an example syslog message:
Jul 10 21:10:50 ra radius[14870]:unix_pass: password for "bob" at 5551234 failed
Failures are currently logged for unknown users and for failed logins where the user profile included Auth-Type = System.
Other syslog messages are more detailed, including the UDP port and RADIUS message ID for easier tracking. The following example syslog message shows a RADIUS packet being forwarded from UDP port 1093 and ID #139 for the source IP address to UDP port 1645 and ID #17 for the destination IP address:
Jul 10 21:10:50 ra radius[14870]:forwarding request from 192.168.96.6/1093.139 to 172.16.3.24/1645.17 for edu.com
- Enhanced debugging
You can turn on RADIUS debugging by sending a SIGUSR1 signal to radiusd . Sending a SIGUSR2 signal to radiusd turns debugging off. The RADIUS server logs a short summary message of radiusd activity when either signal is sent and when radiusd is exited. See "Turning on the Debug Function" on page A-5 for instructions.
 Lucent InterNetworking Systems does not support modified RADIUS code.
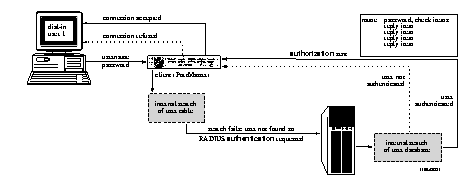 RADIUS Authentication and Authorization