[Top] [Table Of Contents] [Prev] [Next] [Index]
2 out of 2 total pages
 

PortMaster--Getting Started  


       Your PortMaster Roadmap
 

  1


    Review available Lucent Remote Installation Services.


  For a description of remote installation services, see the section Remote Installation Services  on page 7.
  If you decide to use one of Lucent's remote installation services, call Technical Support for an appointment before proceeding.


  2


    Check the contents of the carton.

 
  Use the labels on the boxes to verify that you received
  •  PortMaster hardware required for operation
  •  PortMaster Software CD
  •  Installation guide
  You must supply a cable for the console connection and standard Ethernet cable(s) not included in the box. Download additional manuals from the PortMaster Software CD, or view them and order printed copies at http://www.livingston.com.


  3


    Record the information you need for connection.

 
  Ethernet IP address
  _____ . _____ . _____ . _____
 
  Ethernet IP netmask
  _____ . _____ . _____ . _____
 
  IP address of default gateway
  _____ . _____ . _____ . _____
 
  !root  Password

  ________________________


  4


    Connect a console to the PortMaster and start it up.


  5


    Verify your network connections.

 
  Use the ping command to verify connectivity between your PortMaster and the default gateway router.
  If you receive no response, recheck the configuration from Step 3 above and verify the following:
  •  The host or router is running and is connected to the Ethernet network.
  •  All cables are connected properly to the PortMaster.


  6


    Verify that the PortMaster has the latest version of ComOS® software.

 
  Go to http://www.livingston.com/forms/one-click-dnload.cgi to verify that the PortMaster has the latest version of ComOS.

If an upgrade is unnecessary, proceed to Step 8.


  7


    Upgrade to the latest version of ComOS.


  a. Obtain and install the PMVisionTM application.
See the section PMVision  on page 11.

  b. Use PMVision to save the PortMaster configuration.

  c. Download the following:

  ¯ Release notes-- ftp://ftp.livingston.com/pub/le/doc/release

  ¯ ComOS-- ftp://ftp.livingston.com/pub/le/upgrades

  ¯ GENERIC-- ftp://ftp.livingston.com/pub/le/netboot

  d. Save ComOS where PMVision has access to it.

  e. Perform the upgrade using PMVision.

  If the upgrade fails, do not reboot. Call Technical Support.


  8


    Configure the PortMaster.

 
  Use the Worksheet  on page 6. Consult the following manuals and the PMVision online help as necessary:

  · PortMaster Command Line Reference

  · PortMaster Configuration Guide

  · PortMaster Routing Guide

  · Installation guide


  9


    Verify your configuration.


  a. Save your configuration.

  b. Reboot the PortMaster.

  c. Log in as !root.

  d. Enter show ether0 to verify your configuration.


  10


    Back up your PortMaster configuration.

 
  •  Back up your configuration using PMVision or PMTools.
  •  Change your !root password. Store a copy of the IP address and new !root password in a secure location.


  11


    Set up a system recovery strategy.


  a. Select a workstation host on your Ethernet network to use as a TFTP boot server. It must be able to run a TFTP server.

  b. Configure and test the server for TFTP use.

  c. Optionally, load or configure the rarpd daemon or the bootp application onto the server.

  d. Download the appropriate PMVision, ComOS, and GENERIC files for your PortMaster--Steps 7a through d.

  e. Upgrade these files whenever you upgrade the files on your PortMaster.

  f. Locate netbooting instructions in the PortMaster Troubleshooting Guide.


       Worksheet


       Remote Installation Services

  The Lucent Technologies InterNetworking Systems offers two options for remote installation support over the telephone:
  Hardware Installation and System Software Configuration Service is included with the purchase of products from the Lucent InterNetworking Systems to aid customers who perform their own installations. Data networking experts can provide up to 1 hour of remote assistance. Technical support specialists configure remote units for maximum performance and test all routing connectivity. Service is available during standard business hours, Monday through Friday, 7 a.m. to 5 p.m. Pacific Time, excluding holidays.
  Network Design and Integration Services provide assistance other than standard installation and configurations. Professional services include network design, circuit provisioning, creating and testing filters, and configuration of multivendor products in your network. Pricing is based on an hourly rate and the number of units to be configured.
 
  Appointments must be scheduled with minimum 24-hour notice, Monday through Friday except holidays.
  For additional information about InterNetworking Systems Service Solutions, go to http://www.livingston.com/tech/support/services


  HARDWARE INSTALLATION AND SYSTEM SOFTWARE CONFIGURATION

  NETWORK DESIGN AND INTEGRATION


 Included with product purchase from the Lucent InterNetworking Systems  Hourly rate

  What Lucent Provides

 Verification that unit operates to design specifications and works within the existing network environment.  Professional services beyond standard installation and configuration.

  Network Design

 Provided by customer or by Lucent via pre-sales agreement.  Completed by Lucent.

  Circuit Provisioning

 Provided by customer before installation.  Completed by Lucent.

  Requirements

  •  Customer unpacks, assembles, and connects console and cables.
  •  Customer installs units.
  •  Customer starts up unit and performs self-test.
 Customer must have purchased InterNetworking Systems products or services.

  Toll-Free Access to Lucent Help Desk

 7 a.m. to 5 p.m. Pacific Time--up to 1 hour of support.  7 a.m. to 5 p.m. Pacific Time.

  Configuration by Lucent

  •  Set DIP switches.
  •  Set global parameters.
  •  Set Ethernet ports, async ports, and ISDN ports.
  •  Netboot and upgrade ComOS.
  •  Verify system configuration, network connectivity and options for items listed above.
  •  OSPF or BGP routing parameters configured by Lucent.
  •  Multivendor products configured by Lucent.
  •  Verify system configuration, network connectivity and options for items listed above.

  Setup by Lucent

 Set up user table and location table, and enable modem table.  RADIUS user files set up by Lucent.

  Configuration Backup and System Recovery

 Designed and completed by customer.  Designed and tested by Lucent.

  Filters

 Completed by customer.  Filter list created and designed by Lucent.
 

       Troubleshooting
 

  Password Override

  If you forget or lose your password, follow this procedure to reset it:

  1. Set DIP switch 1 up, and turn the power on.

  2. At the login: prompt, enter !root.

  3. At the Password: prompt, enter override.

  4. Write down the 16-character challenge. Call Technical Support for the override password. Do not attempt another login as !root because doing so will cause the challenge to change.


  LED Indicators--What They Mean

  System LED (Single LED Next to DIP Switches)

  Ethernet LED

  T1/E1 Status LEDs (PortMaster 3 and PortMaster 4 Only)

  •  Blinks off every 5 seconds--normal operation.
  •  Red or amber--blinks during network activity.

  Green

  Red or Amber

  Line Status

  •  Other behavior--see installation guide.
  •  Green--turns on when 10BaseT link is established.
 off  off  Line is not connected.
 off  on  Line is attempting to synchronize with the switch.
 on  off  Line is operational.
 on  on  Line is physically synchronized. (PRI only)


  DIP Switch Settings--What They Mean

  PortMaster products are shipped with DIP switches set down--to the right for the PortMaster 4.
The PortMaster 4 comes with DIP switches 1 and 2 only. The Office Router comes with DIP switches 1, 2, and 3 only.

  DIP 1

  DIP 2

  DIP 3

  DIP 4

  DIP 5

  Ethernet

 Up (left)--
Console
 Up (left)--
Netbooting
 Leave down unless instructed otherwise by Technical Support

  Up

  Up

  10BaseT

 Down (right)--Normal operation  Down (right)--
Booting from nonvolatile RAM

  Down

  Up

  10Base5 (AUI)

  Down

  Down

  10Base2 (BNC)


  Debugging PPP Negotiations

  To debug PPP negotiations using Lucent's PPP Decoder Ring, go to http://www.livingston.com/tech/support/dring.html.


  Summary of Debug Commands

  For detailed information about these commands, see the PortMaster Command Line Reference .
Enter the set console  command to display output to the console.
 set debug off
 set debug Hex
 set debug clock on|off
 set debug ccp-stac on|off
 set debug termination on|off
 set debug mcppp-event on|off
 set debug mdp-status|mdp-events|mdp-max on|off
 set debug isdn|isdn-dframes|isdn D0|isdn-l1 D0|v120 on|off
 set debug bgp-fsm|bgp-opens|bgp-keepalives|bgp-updates|bgp-notifications|bgp-errors
|bgp-packets on|off
 set debug ospf-hello|ospf-event|ospf-spfcalc|ospf-lsu|ospf-lsa|ospf-dbdesc | ospf-error
|ospf-routing|ospf-max on|off
 

       PMVision
 
 PMVision is a Java application you can use to configure, monitor, and manage PortMaster products.

  PMVision Requirements

  •  UNIX, Microsoft Windows 95, or Windows NT.
  •  64MB RAM.
  •  Sun Java Development Kit (JDK) or Java Runtime Environment (JRE) 1.1.4. JDK or JRE 1.1.6 is recommended. See the PMVision README file for information on obtaining and installing Java.

  Installing PMVision

  1. Go to ftp://ftp.livingston.com/pub/le/software/java and download the appropriate files for your system.

  Solaris

 get pmvisionVersion_solaris.tar

  Other UNIX Systems

 get pmvisionVersion_unix.tar

  Microsoft Windows

 get pmvisionVersion.zip

  2. Run the installation.

  Solaris

 At the command prompt, enter  tar xvf pmvisionVersion_solaris.tar
./pmvision_install.bin

  Other UNIX Systems

 At the command prompt, enter  tar xvf pmvisionVersion_unix.tar
mv*.jar Destinationdirectory
mv pmvision Destinationdirectory more README_PMVision

  Windows

 Unzip the pmvisionVersion.zip file, run pmvision_install.exe, and follow the instructions in the installation application.  Install PMVision in the Windows Start menu, or create a desktop icon. See your Windows documentation for more information.

  3. Start PMVision.

  Solaris and Other UNIX Systems

 At the shell prompt, go to the directory where PMVision is installed and type pmvision.

  Windows

  •  If you installed PMVision in the Start menu, go to Start and click PMVision.
  •  If you created a desktop shortcut, double-click the PMVision icon.

  Connecting to a PortMaster

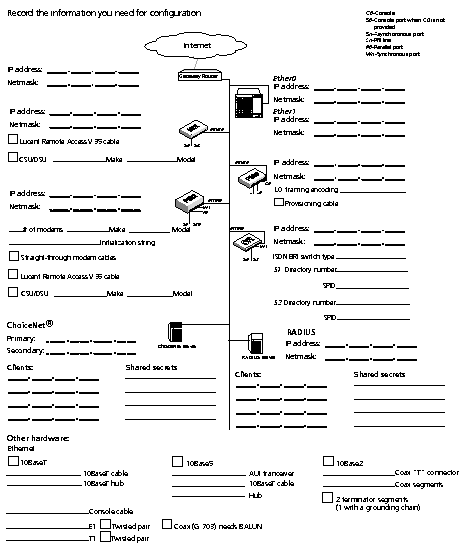
 The PortMaster you are connecting to must have an IP address, netmask, and gateway assigned via the ComOS command line. See Your PortMaster Roadmap  on page 3.

  1. Enter the PortMaster IP address, or select a saved PortMaster name from the pull-down list.

  2. Enter the username and password--usually !root--and click Connect.

  3. To connect to additional PortMaster products, repeat these steps. The active PortMaster is highlighted.

  4. Shift-click or control-click to activate multiple connected PortMaster products.


       Subnet Mask Table
 

  255.255.255

  .252

  .248

  .240

  .224

  .192

  .128

  Subnet Bits

  /30

  /29

  /28

  /27

  /26

  /25

  Hex

  0xF8

  0xF8

  0xF0

  0xE0

  0xC0

  0x80

  Network Address

  0

  0

  0

  0

  0

  0


  4


  8

  8


  12


  16

  16

  16


  20


  24

  24


  28


  32

  32

  32

  32


  36


  40

  40


  44


  48

  48

  48


  52


  56

  56


  60


  64

  64

  64

  64

  64


  68


  72

  72


  76


  80

  80

  80


  84


  88

  88


  92


  96

  96

  96

  96


  100


  104

  104


  108


  112

  112

  112


  116


  120

  120


  124


  128

  128

  128

  128

  128

  128


  132


  136

  136


  140


  144

  144

  144


  148


  152

  152


  156


  160

  160

  160

  160


  164


  168

  168


  172


  176

  176

  176


  180


  184

  184


  188


  192

  192

  192

  192

  192


  196


  200

  200


  204


  208

  208

  208


  212


  216

  216


  220


  224

  224

  224

  224


  228


  232

  232


  236


  240

  240

  240


  244


  248

  248


  252


       Connecting and Starting Up Your PortMaster


       First--Set up the console port and boot up.

  To connect your PortMaster to a terminal or terminal emulator via the console port (port S0 or C0):

  1. Make sure the power switch on the PortMaster is turned off.

  2. Attach the power cord to the PortMaster and to a properly grounded electrical outlet.

  3. Set your terminal or PC terminal emulator for the following:

  ¯ Transmission at 9600 baud, 8 data bits, 1 stop bit, and no parity

  ¯ Software flow control (XON/XOFF).

  4. Set DIP switch 1 up. For the PortMaster 4, set it to the left.

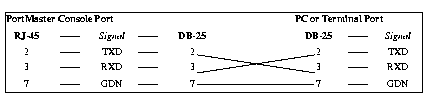
  5. Attach one end of the appropriate cable to the PortMaster console port (S0 or C0), and the other end to the serial port on the terminal or PC. Keep the connection simple.

  ¯ For a PortMaster 4 or an Office Router, use an RJ-45-to-DB-25 console cable. Attach the RJ-45 end to the router port and the DB-25 (female) end to the PC or terminal port. You might need an adapter for a PC. You might need to supply a gender changer for a terminal.

  ¯ For all other PortMaster products, use an RS-232 null modem cable.

  Use the following diagram to verify the minimum cable pinout required:
 
  Connectors:
 

  6. If necessary, set DIP switches 4 and 5 according to your Ethernet port type. See DIP Switch Settings--What They Mean  on page 9.

  7. With the appropriate cable, connect the 10BaseT Ethernet port on the PortMaster to an Ethernet hub, or connect the 10Base5 (AUI) or 10Base2 (BNC) Ethernet port to a transceiver.

  8. Turn the power on.

The PortMaster boots itself and displays a PortMaster Console login: prompt on the terminal or PC screen. If you do not see the login prompt, see the Troubleshooting Guide or call Technical Support.


       Second--Set up the Ethernet connection.

  1. At the login: prompt, enter !root.

  2. At the Password: prompt, press Return if you are starting your PortMaster for the first time. Otherwise, enter your password.

  3. At the Command> prompt, enter the following commands and press Return after each:

  Command> set ether0 address Ipaddress

  Command> set ether0 netmask Ipmask

  Command> set gateway Ipaddress of default router

  Command> save all
Command> reboot


       Contacting Technical Support
 
  For all technical support requests, record your PortMaster model number and the ComOS
version number for the technical support staff or your authorized sales channel partner.

  For the EMEA Region

  •  If you are an Internet service provider (ISP) or end user in Europe, the Middle East, Africa, India, or Pakistan, contact your local Lucent InterNetworking Systems sales channel partner. For a list of authorized sales channel partners, see the World Wide Web at
    http://www.livingston.com/International/EMEA/distributors.html.
  •  If you are an authorized Lucent InterNetworking Systems sales channel partner in this region, contact the Lucent InterNetworking Systems EMEA Support Center Monday through Friday between the hours of 8 a.m. and 8 p.m. Pacific Time (GMT+1), excluding French public holidays.

      ¯ By voice, dial +33-4-92-92-48-48.

      ¯ By fax, dial +33-4-92-92-48-40.

      ¯ By electronic mail (email) send mail to emea-support@livingston.com.


  For North America, the Caribbean and Latin America (CALA), and the Asia Pacific Region

  Contact Lucent InterNetworking Systems Monday through Friday between the hours of 7 a.m. and 5 p.m. (GMT -8). In North America you can schedule a 1-hour software telephone installation appointment by calling the technical support telephone number listed below. Appointments must be scheduled at least one business day in advance.
  By voice, dial 800-458-9966 within the United States (including Alaska and Hawaii), Canada, the Caribbean and Latin America (CALA), or +1-925-737-2100 from elsewhere.
  By email, send mail as follows:

  ¯ From North America, the Caribbean and Latin America (CALA) to support@livingston.com.

  ¯ From the Asia Pacific Region to asia-support@livingston.com.

  Using the World Wide Web, see http://www.livingston.com.


  PortMaster Hardware Warranty

  The PortMaster comes with a 1-year warranty for hardware--including resident system software--beginning on the date of product installation or 3 months from the original ship date, whichever comes first.
  The hardware warranty includes remote telephone support between 7 a.m. and 5 p.m. Pacific Time, Monday through Friday, excluding holidays. The warranty also includes advanced replacement of parts for hardware failures. Next-business-day delivery is available if the request for advanced replacement is received before 3 p.m. Pacific Time, Monday through Friday excluding holidays.
  Enhanced warranty options are available for 24-hour remote technical support and onsite services. For descriptions and pricing, see http://www.livingston.com/tech/support/services.


  Technical Bulletins

  To receive postings about technical bulletins from the Lucent InterNetworking Systems, sign up at http://www.livingston.com/tech/bulletin.


  PortMaster ComOS Software

  Information about new releases is available at ftp://ftp.livingston.com/pub/le/doc/release. Please obtain and read the release note information before upgrading.
  ComOS upgrades and images of PortMaster software are available by anonymous FTP from ftp://ftp.livingston.com/pub/le/upgrades.


  PortMaster Training Courses

  Lucent InterNetworking Systems offers hands-on, technical training courses on PortMaster products and their applications. For course information, schedules, and pricing, visit the Lucent InterNetworking Systems website at http://www.livingston.com, click Services & Support, and then click Training & Certification.


[Top] [Table Of Contents] [Prev] [Next] [Index]
2 out of 2 total pages
spider@livingston.com
Copyright © 1999, Lucent Technologies. All rights reserved.