[Top] [Table Of Contents] [Prev] [Next] [Index]
12 out of 21 total pages
 

Configuring L2TP   9


  This chapter describes how to set up a Layer 2 Tunneling Protocol (L2TP) tunnel between a PortMaster 4 and another L2TP-compatible router.
  This chapter includes the following topics:
  See the PortMaster 4 Command Line Reference for more detailed command descriptions and instructions.

  Note ¯ You must be running RADIUS 2.1 or later to configure L2TP. Earlier versions of RADIUS do not support call-checking.


       Overview of L2TP

  The Layer 2 Tunneling Protocol (L2TP) allows PPP frames to "tunnel" across the Internet. Tunneling is the encapsulation of one type of protocol within another protocol. In L2TP, PPP frames are encapsulated in IP packets. The ComOS implementation of L2TP currently has no built-in encryption capability.
 

       L2TP Components

  This section describes the fundamental components of L2TP and how they work together to tunnel data across the Internet.
  L2TP allows PPP frames to be tunneled from a PortMaster answering dial-in calls to another PortMaster (or any L2TP-capable router) that processes the PPP frames. With L2TP, the functionality normally provided by one PortMaster is provided by two devices:
  An outsourcer can use L2TP to provide dial-up access to a variety of clients (usually businesses or organizations) from a common physical dial-up pool. The dial-up pool resides on a shared access server (the LAC). The dial-up client maintains a home gateway (the LNS) and some type of IP connectivity to the outsourcer. IP connectivity can take place over point-to-point dedicated circuits, or over a network via Frame Relay, Asynchronous Transfer Mode (ATM), or any supported data transfer protocol.
  In this configuration, L2TP provides virtual dial-up ports to the outsourcer clients. This setup is sometimes referred to as a virtual private dial-up network (VPDN). The service is transparent to client users--users still terminate PPP sessions on the client's network via the LNS, and clients do their own RADIUS authentication, accounting, and IP address assignment.
  Locally stored profiles are not supported for L2TP. You must use RADIUS 2.1; in fact, most of the L2TP setup involves RADIUS configuration. See "Configuring L2TP on the RADIUS Server" on page 9-9 for more information.
  L2TP is currently not supported on the PortMaster 2, PortMaster 25, PortMaster IRXTM, or PortMaster Office Router platforms.
 

       How L2TP Works

  Basic L2TP service operates as follows. The LAC accepts a call and establishes a tunnel to the LNS for that PPP session. The LAC just accepts the call; it does not process PPP packets. Authentication is done on the LNS, where the call terminates.
  The tunnel can be established based upon the RADIUS check item Called-Station-Id or on the value of the User-Name attribute. If the call is based upon User-Name, partial authentication occurs on the LAC before the tunnel is established.
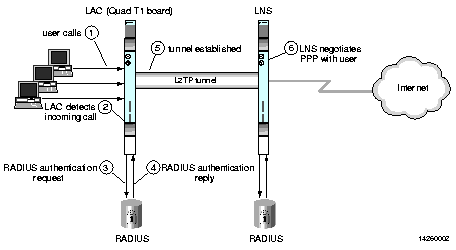
  A session using Call-Check as a Service-Type and Called-Station-Id as a check item with L2TP proceeds as follows:

  1. The dial-up user places a call.

  2. The LAC detects the incoming call.

  3. Using call-check, the LAC sends an authentication request to a RADIUS server containing the Called-Station-Id and Calling-Station-Id before answering the call. (See "Overview of Call-Check" on page 9-8.)

  4. RADIUS accepts the user (if authentic) and sends an accept message to the LAC containing information about how to create the L2TP tunnel for this session.

  5. The LAC creates a tunnel to the LNS by encapsulating the PPP frames into IP packets and forwarding those packets to the LNS.

  6. The LNS negotiates PPP with the end user.

  Figure 9-1 illustrates the basic operation of L2TP tunneling. Tunnel authentication can be set to either end of the tunnel, or both ends for mutual authentication. See "Setting L2TP Tunnel Authentication (Optional)" on page 9-8.

  Figure 9-1 L2TP Tunnel Operation


       Configuring L2TP on the PortMaster 4

  This section describes how to configure the PortMaster portion of an L2TP configuration. Because locally stored profiles are not supported for L2TP, you must use RADIUS. For information about configuring the RADIUS portion of L2TP, see "Configuring L2TP on the RADIUS Server" on page 9-9.
  You use the following command to configure L2TP on a PortMaster 4:

  Command> set l2tp noconfig|disable|enable lac|enable lns

  With this command you can designate an entire PortMaster 4 as either a LAC or an LNS, or you can configure individual line boards by slot. The "inheritance" property of the set l2tp  noconfig  command allows you some options. For example, you might want to use a PortMaster 4 exclusively as a LAC. In that case, you set each installed board for L2TP with the noconfig  keyword and globally enable the LAC functionality on the manager module. When you reboot the PortMaster, all installed line boards set with the noconfig  keyword inherit the L2TP configuration from the manager module. Line boards without the noconfig  setting retain their original configuration settings.
  After you set noconfig  on each board, you can selectively disable L2TP on individual boards, or you can configure any individual board to function as an LNS. New line boards do not automatically inherit the L2TP configuration of the manager module; you must set the new board with the noconfig  keyword, or you can enable the LAC or LNS functionality individually on the board. When you configure L2TP individually on Quad T1 or Tri E1 boards, the board configuration overrides the global configuration.

  Note ¯ Line ports on a Quad T1 or Tri E1 line board configured as an LNS are automatically set as T1 or E1 and can no longer be used for dial-in. The virtual S0 ports become W1 ports.


       Setting the View

  You can configure an individual board in the PortMaster 4 as a LAC or an LNS, or you can configure it to inherit its L2TP configuration from the manager module. To configure an individual board, you must first set the view to the slot with the installed board:

  Command> set view Slotnumber


       Setting Up a LAC

  You designate a line board or an entire PortMaster 4 as a LAC by enabling the LAC feature in ComOS. The LAC feature is disabled by default.
  To configure a line board as a LAC, you enable the LAC functionality on the board. When you configure a line board individually, the configuration for that board overrides the global configuration on the PortMaster 4. To configure an individual line board as a LAC, you must set the view to the appropriate slot and enable the LAC functionality.
  For example, to designate a line board in slot 0 as a LAC, enter the following commands:

  Command> set view 0
Command 0> set l2tp lac enable
Command 0> save all
Command 0> reset slot0

  To disable the LAC functionality on an individual line board, set the view to the appropriate slot and enter the following command:

  Command 0> set l2tp lac disable

  A line board disabled for LAC no longer inherits the L2TP configuration from the manager module when the PortMaster is rebooted.
  To set up an entire PortMaster 4 as a LAC, you set each line board for L2TP with the noconfig  keyword and enable the LAC feature globally on the manager module. The noconfig  setting enables individual boards to inherit the L2TP configuration from the manager module.
  Follow this procedure to set up an entire PortMaster 4 as a LAC:

  1. Set the view to the first slot with an installed line board.

  Command> set view Slotnumber

  2. Configure the line board to inherit its LAC configuration from the manager module.

  Command Slotnumber> set l2tp noconfig lac

  3. Save the configuration and reset the slot.

  Command Slotnumber> save all
Command Slotnumber> reset slotSlotnumber

  4. Repeat Steps 1 through 3 for all remaining line boards.

  5. Set the view to the manager module and globally enable the LAC functionality.

  Command Slotnumber> set view 4
Command> set l2tp lac enable

  6. Save the changes and reboot the PortMaster for the changes to take effect.

  Command> save all
Command> reboot

  To globally disable the LAC functionality on a PortMaster, set the view to the manager module and enter the following commands:

  Command> set l2tp disable lac
Command> save all
Command> reboot

  When you reboot the PortMaster, all line boards set with the noconfig  keyword inherit the disable  setting from the manager module. If you do not want all line boards to automatically inherit the disable  setting upon reboot, you can alternatively enter the following commands on the manager module:

  Command> set l2tp noconfig
Command> save all
Command> reboot

  Now when you reboot the PortMaster, line boards retain their own configurations. This approach is useful if you want to add new line boards to the PortMaster with configurations other than for L2TP, or if you want to configure LAC and LNS functionality on the same PortMaster.
  Refer to the PortMaster 4 Command Line Reference for more details about commands, and for ComOS release-specific versions of L2TP commands.

  Note ¯ An entire PortMaster 4 cannot operate as both an LNS and a LAC at the same time. You can configure one board as a LAC and another board as an LNS on the same PortMaster 4, but these two boards must function as end points for independent tunnels.


       Setting Up an LNS

  The LNS feature is disabled by default. You designate an LNS board or an entire PortMaster 4 as the end point of an L2TP tunnel by enabling the LNS feature in ComOS. The PortMaster thereafter supports in-band channelized connections only on the LNS board. If you configure a Quad T1 or Tri E1 board as an LNS, line ports are automatically set as T1 or E1 and can no longer be used for dial-in. The virtual S0 ports become W1 ports. Only commands associated with channelized T1 or E1 connections are allowed on those lines.
  Individual Line Board Configuration
  To configure an LNS line board or a Quad T1 or Tri E1 line board as an LNS, you enable the LNS functionality on the board. When you configure a line board individually, the configuration for that board overrides the global configuration on the PortMaster 4. To configure an individual line board as an LNS, you must set the view to the appropriate slot and enable the LNS functionality.
  For example, to designate a line board in slot 0 as an LNS, enter the following commands:

  Command> set view 0
Command Slotnumber> set l2tp lns enable
Command Slotnumber> save all
Command Slotnumber> reset slot0

  To disable the LNS functionality on an individual line board, set the view to the appropriate slot and enter the following command:

  Command Slotnumber> set l2tp disable

  A line board disabled for LNS no longer inherits the L2TP configuration from the manager module when the PortMaster is rebooted.
  To set up an entire PortMaster 4 as an LNS, you set each line board for L2TP with the noconfig  keyword and enable the LNS feature globally on the manager module. The noconfig  setting enables individual boards to inherit the L2TP configuration from the manager module.
  Follow this procedure to set up an entire PortMaster 4 as an LNS:

  1. Set the view to the first slot with an installed line board.

  Command> set view Slotnumber

  2. Configure the line board to inherit its LNS configuration from the manager module.

  Command Slotnumber> set l2tp noconfig lns

  3. Save the configuration and reset the slot.

  Command Slotnumber> save all
Command Slotnumber> reset Slotnumber

  4. Repeat Steps 1 through 3 for all remaining line boards.

  5. Set the view to the manager module and globally enable the LNS functionality.

  Command Slotnumber> set view 4
Command> set l2tp lns enable

  6. Save the changes and reboot the PortMaster for the changes to take effect.

  Command> save all
Command> reboot

  To globally disable the LNS functionality on a PortMaster, set the view to the manager module and enter the following commands:

  Command> set l2tp disable
Command> save all
Command> reboot

  When you reboot the PortMaster, all line boards set with the noconfig  keyword inherit the disable  setting from the manager module. If you do not want all line boards to automatically inherit the disable  setting upon reboot, you can alternatively enter the following commands on the manager module:

  Command> set l2tp noconfig
Command> save all
Command> reboot

  Now when you reboot the PortMaster, line boards retain their own configurations. This approach is useful if you want to add new line boards to the PortMaster with configurations other than for L2TP, or if you want to configure LAC and LNS on the same PortMaster.
  Refer to the PortMaster 4 Command Line Reference for more details about commands, and for ComOS release-specific versions of L2TP commands.

  Note ¯ An entire PortMaster 4 cannot operate as an LNS and a LAC at the same time. You can configure one board as a LAC and another board as an LNS on the same PortMaster 4, but these two boards must function as end points for independent tunnels.


       Load Balancing Among Tunnel Server End Points (Optional)

  When you configure redundant tunnel server end points on the RADIUS server (see "Configuring Redundant Tunnel Server End Points" on page 9-12), the PortMaster selects tunnel end points serially, always beginning with the first.
  To set the PortMaster to choose tunnel end points randomly, use the following command:

  Command> set l2tp choose-random-tunnel-endpoint on|off


       Setting L2TP Tunnel Authentication (Optional)

  You authenticate L2TP users by setting a password in the RADIUS user profile (see "Configuring a Shared Secret" on page 9-11). Authentication of the user is by session, and is done by the RADIUS server.
  You can also authenticate the tunnel. You can set tunnel authentication in RADIUS, or you can set it on the LAC, the LNS, or both. If you want the RADIUS server to authenticate the tunnel, you must set a tunnel password in RADIUS (see "Configuring a Shared Secret" on page 9-11). RADIUS tunnel authentication takes priority over authentication by either the LAC or the LNS. If tunnel authentication is set on the LAC and/or the LNS and  on the RADIUS server, the RADIUS server authenticates the tunnel.
  To set tunnel authentication on the LAC or the LNS, you must first set an L2TP password locally on the PortMaster. To set a password on the PortMaster, set the view to the manager module and use the following command:

  Command> set l2tp secret  Password|none

  The password is global. You cannot set a password on an individual slot. The none  keyword disables the password. This is the default.
  After you set the L2TP password, use the following command to set remote tunnel authentication:

  Command> set l2tp authenticate-remote on |off 

  If you set remote authentication on the LAC, the LAC initiates authentication and the LNS authenticates. If you set remote authentication on the LNS, the LNS initiates authentication and the LAC authenticates. If you set tunnel authentication on both the LAC and the LNS, the LAC and the LNS authenticate each other. You must reset the slot for remote tunnel authentication to take effect.
  If no tunnel exists, a tunnel is established for the first L2TP session, and tunnel authentication takes place before the session terminates.

  Note ¯ Because tunnels remain established until the PortMaster is rebooted, empty tunnels can exist.


       Overview of Call-Check

  The call-check feature allows an outsourcer (ISP or telephone company providing Internet service) to get the calling number of a dial-in user without accepting the call. A typical application for call-check is to hang up on a user attempting to dial in and then to call the user back, with no charge incurred for the initial call. Call-check can also be used to limit the number of active calls on a given number.
  The call-check feature supports virtual points of presence (POPs) by allowing for redirection of calls. For example, you can set up two telephone numbers, one that is accepted and one that is redirected. If a customer calls the first number, the customer is authenticated normally; if a customer calls the second number, the call is accepted but forwarded through an L2TP session to an LNS for complete authentication of the user.
  Call-check is available for the PortMaster 3 and the PortMaster 4 in ComOS 3.9 and later.
 

       Enabling Call-Check on a PortMaster

  The call-check feature is off by default. To enable or disable the call-check feature, use the following command:

  Command> set call-check on|off


       How Call-Check Works

  When call-check is enabled, the PortMaster sends a RADIUS access-request message for all incoming calls before accepting calls containing the Calling-Station-Id and Caller-Station-Id check items. The PortMaster expects to receive one of the following replies from the RADIUS server:
  When you enable call-check, the show global  command displays the words call-check Enable immediately after the ISDN switch type.

  Note ¯ If the call-check feature is enabled but no RADIUS support is configured, all dial-in users receive either a busy signal or dead air.

  To use the call-check feature, you must modify the RADIUS dictionary on the RADIUS server. See "Configuring L2TP on the RADIUS Server" on page 9-9 for details.
 

       Configuring L2TP on the RADIUS Server

  This section describes how to configure the RADIUS portion of L2TP. "Configuring L2TP on the PortMaster 4" on page 9-3 describes the PortMaster portion of the configuration.

  Note ¯ You must be running RADIUS 2.1 or later to configure L2TP. Earlier versions of RADIUS do not support the call-check feature.

  To define the tunnel configuration for L2TP, you must add some new attributes to the RADIUS dictionary and use them to configure user profiles. This section describes entries you make on the RADIUS server to support L2TP and includes the following topics:
  For more information about RADIUS 2.1, see the RADIUS for UNIX Administrator's Guide.
  You can use entirely separate RADIUS servers for the LAC and the LNS, or use the same one. The difference between a LAC and an LNS is that they authenticate at different stages in the tunneling process. Authentication is based on either a Called-Station-Id check item, a Calling-Station-Id check item, or both--information currently available only for ISDN PRI.
 

       Configuring Call-Check

  To use the call-check feature, you must add the following entries to the dictionary on the RADIUS server and then restart RADIUS so that it reads the new dictionary:
 
 VALUE  Service-Type  Call-Check  10
 VALUE  NAS-Port-Type  Virtual  5
 ATTRIBUT`E  Tunnel-Type  64  integer
 ATTRIBUTE  Tunnel-Medium-Type  65  integer
 ATTRIBUTE  Tunnel-Server-Endpoint  67  string
 ATTRIBUTE  Tunnel-Password  69  string
 VALUE  Tunnel-Type  L2TP  3
 VALUE  Tunnel-Medium-Type  IP  1

  Caution ¯ The Service-Type value has changed from ComOS version 3.8b15, which called it Call-Check-User with the value 129. This value is no longer valid. Make sure to remove any old entries in your dictionary and users file.


       Configuring User Profiles

  RADIUS user profiles on the LNS are the same as non-L2TP user profiles. On the LAC, however, some new user profiles are required. Exactly which additional user profiles you decide to add depends upon whether you use call-check or partial username-based tunneling on the LAC. The profiles in this section can be used on the RADIUS server serving the LAC for call-check or partial username-based tunneling.
  The following sample user profile uses RADIUS check items Called-Station-Id and Call-Check to route callers that dial 555-1313 to the LNS at IP address 192.168.1.221:

  DEFAULT Called-Station-Id = "5551313", Service-Type = Call-Check

  Service-Type = Framed-User,

  Framed-Protocol = PPP,

  Tunnel-Type = L2TP,

  Tunnel-Medium-Type = IP,

  Tunnel-Server-Endpoint = "192.168.1.221"

  The sample user profile in this section is the same as the profile in the previous section except that it uses a shared secret to authenticate the tunnel to the LNS.

  DEFAULT Called-Station-Id = "5551313", Service-Type = Call-Check

  Service-Type = Framed-User,

  Framed-Protocol = PPP,

  Tunnel-Type = L2TP,

  Tunnel-Medium-Type = IP,

  Tunnel-Password = "mysecret",

  Tunnel-Server-Endpoint = "192.168.1.221"

  In both sample user profiles, the first item is the RADIUS check item, the Called-Station-ID, which is used to match the entry before the call is answered. The L2TP parameters are pulled from matching entries.
  The Tunnel-Type specifies the tunneling protocol. The Tunnel-Medium-Type, IP in these examples, specifies the transport medium over which the tunnel is created. Tunnel-Server-Endpoint indicates the other end of the tunnel, the LNS when L2TP is being used.
  If you do not use call-check but provider partial authentication based on the username, you can use the following user profile. In this sample, user sara dials into the LAC, which initiates an L2TP tunnel on the user's behalf to an LNS at IP address 192.168.1.55.

  sara Password = "apassword"

  Tunnel-Type = L2TP,

  Tunnel-Medium-Type = IP,

  Tunnel-Server-Endpoint = "192.168.1.55"

  To ensure continuous L2TP service in the event that the LNS fails, you can configure user profiles to contain redundant tunnel server end points. In this way, if the primary LNS goes down, inbound L2TP tunnels are redirected to alternative LNSs. You can configure up to three redundant tunnel server end points in a user profile.
  The following sample RADIUS user profile uses redundant tunnel server end points. Each tunnel server end point is preceded by the Tunnel-Medium-Type for that tunnel.

  DEFAULT Service-Type = Call-Check, Called-Station-Id = "5551234"

  Service-Type = Framed-User,

  Framed-Protocol = PPP,

  Tunnel-Type=L2TP,

  Tunnel-Medium-Type = IP,

  Tunnel-Server-Endpoint = "192.168.11.2",

  Tunnel-Medium-Type=IP,

  Tunnel-Server-Endpoint = "192.168.11.17",

  Tunnel-Medium-Type=IP,

  Tunnel-Server-Endpoint = "192.168.230.97"

  Note ¯ Acceptance of a tunnel server end point is based on whether the host is running L2TP. However, if the machine designated as the tunnel server end point is configured as a LAC instead of an LNS, the session fails.

  Note ¯ This feature provides redundant backup, not load balancing. See "Load Balancing Among Tunnel Server End Points (Optional)" on page 9-7.


       Configuring Accounting

  Both the LAC and the LNS can log user sessions to RADIUS accounting, but the data available to each depends upon whether you use call-check or partial authentication on the LNS.
  In both cases, the LNS shows the NAS-Port-Type as virtual . In addition, the LAC has the NAS-Port-Type set to the connection type of the physical interfaces, which is the normal behavior of a network access server (NAS).
 

       Administering L2TP on the PortMaster 4

  This section describes administrative tasks you can perform to monitor or change L2TP settings on the PortMaster, and includes the following topics:
 

       Manually Creating a Tunnel

  To aid in troubleshooting and testing an L2TP tunnel configuration, you can manually bring up an L2TP tunnel with the following command:

  Command> create l2tp tunnel udp Ipaddress [Password|none]

  The Ipaddress is the end point of the L2TP tunnel. The password is optional; the default is none . If you specify a password, the PortMaster uses it when responding to a tunnel authentication request from the peer. If you do not specify a password, the PortMaster uses the L2TP secret if configured (see "Setting L2TP Tunnel Authentication (Optional)" on page 9-8). If no L2TP secret is configured, no authentication takes place.
  For example, to create a tunnel to an L2TP-compatible device at IP address 192.168.10.19, enter the following command:

  Command> create l2tp tunnel udp 192.168.10.19


       Displaying L2TP Information

  Use the following command to display information about the current L2TP operation:

  Command> show l2tp global|sessions|stats|tunnels

  You can see whether the PortMaster is configured to be an LNS or a LAC, monitor states of tunnel sessions, and view various internal statistics.
 

       Resetting L2TP Tunnels

  Use the following command to reset counters displayed by the show l2tp stat s command, and to reset tunnel numbers displayed by the show l2tp tunnels  command:

  Command> reset l2tp [stats|tunnel Number]

  When you specify the optional stats  keyword, only the statistics are reset. If you are not just resetting the statistics, specifying the stats  keyword with this command closes all open PPP sessions.
 

       Troubleshooting L2TP

  Use the following command to display information about the entire PortMaster, or about specific line boards. Set the view to the appropriate slot to display information about a line board.

  Command> set debug l2tp max|packets [Bytes]|rpc|setup|stats


       PPP Tracing

  Use the set debug 0x51  command for PPP tracing on the LNS. If you are not using the call-check feature, this command also works normally on the LAC.
 

       Modem Connections

  You can view the Tx (transmit) speed of the connection on both the LAC and LNS and extended connection information, such as Rx (receive) speed, retrained speeds, and any changes due to modem renegotiations on the LAC only.
  To view the connect speed on the LNS and display the speed and other information about the LAC, use the following command:

  Command> show modems


       Accounting for Firewalls between a LAC and an LNS

  L2TP operates entirely over the User Datagram Protocol (UDP) on destination port 1701. The source port is determined by the PortMaster and is based on available ports with values greater than 1024. Keep this in mind when defining filter rules if you have a firewall between your LAC and LNS.
 

[Top] [Table Of Contents] [Prev] [Next] [Index]
12 out of 21 total pages
spider@livingston.com
Copyright © 1999, Lucent Technologies. All rights reserved.