Note ¯ ![]() Only one Telnet session can receive console messages at a time.
Only one Telnet session can receive console messages at a time.
Command> set nameserver Ipaddress
Command> set nameserver 2 Ipaddress
Note ¯ ![]() Only one Telnet session can receive console messages at a time.
Only one Telnet session can receive console messages at a time.
Command> set loghost Ipaddress
Note ¯ ![]() Do not set a loghost at a location configured for on-demand connections, because doing so keeps the connection up or brings up the connection each time a syslog message is queued for the syslog host .
Do not set a loghost at a location configured for on-demand connections, because doing so keeps the connection up or brings up the connection each time a syslog message is queued for the syslog host .
Command> set syslog Logtype disabled
Command> set syslog Logtype Facility. Priority
Command> set serial-admin on |off
1. The Local IP address configured in the user profile, if set
2. The global reported IP address, if set
3. The first global local IP address, if set
4. The second global local IP address, if set
5. The third global local IP address, if set
1. The first global local IP address, if set
2. The second global local IP address, if set
3. The third global local IP address, if set
4. The fourth global local IP address, if set
Command> set local-ip-address [1 |2 |3 |4 ] Ipaddress
Command> set local-ip-address 10.112.34.17
Local IP Address (1) changed from 0.0.0.0 to 10.112.34.17
Command> set local-ip-address 2 192.168.54.6
Local IP Address (2) changed from 0.0.0.0 to 192.168.54.6
Command> set assigned_address Ipaddress
Note ¯ ![]() If you decrease the number of addresses in the pool, you must reboot the PortMaster for the change to take effect.
If you decrease the number of addresses in the pool, you must reboot the PortMaster for the change to take effect.
Note ¯ ![]() Configuration information for IP pool is stored in the file /manager/ippools . If you use the erase command to delete this file, you remove the entire IP pool.
Configuration information for IP pool is stored in the file /manager/ippools . If you use the erase command to delete this file, you remove the entire IP pool.
1. If a named IP pool is configured in the pool table and the RADIUS user profile has the IP-Pool-Name attribute configured for the user, the PortMaster assigns an address from the named IP pool.
2. If the IP-Pool-Name attribute is not configured in the RADIUS user profile and an address range is configured for the Quad T1 or Tri E1 board that the user comes in on, the PortMaster assigns the user an address from the address range configured for the Quad T1 or Tri E1 board.
3. If the IP-Pool-Name attribute is not configured in the RADUS user profile and the Quad T1 or Tri E1 board's assigned range is set to 0.0.0.0, and a default IP pool is configured in the pool table, the PortMaster assigns the user an address from the address range specified for the default IP pool.
Command> show table ippool
Name: livermore Default Gateway: 10.23.45.56
Address/netmask Gateway
------------------ -----------------
192.168.1.0/29 0.0.0.0
192.168.2.253/30 0.0.0.0
192.168.3.50/25 0.0.0.0
10.4.5.0/24 192.168.222.3
Note ¯ ![]() After you issue the reset ippool command, the routing protocols can take a short while to replace the old routes.
After you issue the reset ippool command, the routing protocols can take a short while to replace the old routes.
Command> delete ippool Name address-range Ipaddress|all
Command> delete ippool livermore address-range 192.168.1.0
Range 192.168.1.0 in livermore successfully deleted
Command> delete ippool livermore all
Pool livermore successfully deleted
Command> set ippool Name Ipaddress/NM|Ipaddress Netmask [Gateway]
Command> set ippool livermore address-range 192.168.1.0/24
Range 192.168.1.0/24 256 with gateway 0.0.0.0 add to livermore
Command> set ippool livermore address-range 192.168.1.0 255.255.255.0
Range 192.168.1.0/24 256 with gateway 0.0.0.0 add to livermore
Command> set ippool livermore address-range 192.168.1.0/24 10.34.56.78
Range 192.168.1.0/24 256 with gateway 10.34.56.78 add to livermore
Command> set ippool Name default-gateway Gateway
ATTRIBUTE Ip-Pool-Name 193 string
homers Password = "kwyjibo"
Service-Type = Framed-User,
Framed-Protocol = PPP,
Framed-IP-Address = 255.255.255.254,
Framed-IP-Netmask = 255.255.255.255,
Ip-Pool-Name = livermore
Command> set dhcp server address
Note ¯ ![]() ComOS does not support DHCP requests over Ethernet--nor requests from a PortMaster 2Ei or a PortMaster ISDN Office Router (OR-U) used for dial-up.
ComOS does not support DHCP requests over Ethernet--nor requests from a PortMaster 2Ei or a PortMaster ISDN Office Router (OR-U) used for dial-up.
Figure 2-1 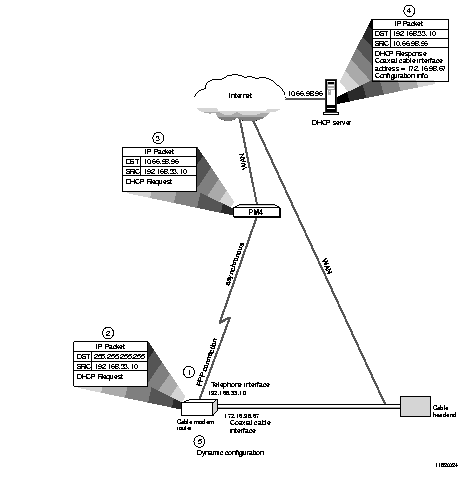 Cable Modem Telephone Return Interface Startup
1. Using the telephone interface, the cable modem dials the PortMaster 4 and establishes a PPP connection. The PortMaster 4 assigns IP address 192.168.33.10 to the telephone interface of the cable modem.
2. Using the telephone interface, the cable modem broadcasts a DHCP request. The destination of the request is 255.255.255.255 and the source is 192.168.33.10.
3. The PortMaster 4 forwards the request to the DHCP server by substituting the IP address of the DHCP server (10.66.98.96) for the broadcast destination address.
4. The DHCP server responds with configuration information for the cable modem and an IP address (172.16.98.67) for the coaxial cable interface on the cable modem.
5. Using the configuration information received from the DHCP server, the cable modem dynamically assigns 172.16.98.67 to the cable interface, and configures the cable modem so that upstream IP packets leave the cable modem via the telephone interface with the IP address of the cable interface (172.16.98.67) as the source address. Because packets now carry the source address of the cable interface, response to these packets travels via the coaxial cable.
Command> set dhcp server 0.0.0.0.
Command> show routes [ String| Prefix/NM]
Note ¯ ![]() The PortMaster 4 supports the IPX protocol when running ComOS 4.1 or later. IPX is not supported in ComOS 4.0.
The PortMaster 4 supports the IPX protocol when running ComOS 4.1 or later. IPX is not supported in ComOS 4.0.
Note ¯ ![]() Never set the gateway for the PortMaster to an address on the same PortMaster; the gateway must be on another router.
Never set the gateway for the PortMaster to an address on the same PortMaster; the gateway must be on another router.
Command> add route Ipaddress[/ NM] Ipaddress(gw) Metric
Command> save all
Command> delete route Ipaddress[/ NM] Ipaddress(gw)
Command> save all
For IPX networks, the gateway address consists of 8 hexadecimal digits for the network address, a colon (:) and the node address of the gateway router expressed as 12 hexadecimal digits--for example, 00000002:A0B1C2D3E4F5.
The IPX node address is usually the media access control (MAC) address on a PortMaster.
Note ¯ ![]() Never set the gateway for the PortMaster to an address on the same PortMaster; the gateway must be on another router.
Never set the gateway for the PortMaster to an address on the same PortMaster; the gateway must be on another router.
Command> add route Ipxnetwork Ipxaddress Metric Ticks
Command> save all
Command> delete route Ipxnetwork Ipxaddress
Command> save all
Command> set ipxgateway Network|Node Metric
Note ¯ ![]() You can delete only static routes.
You can delete only static routes.
Note ¯ ![]() ComOS 4.1 and later releases support both RIP-1 and RIP-2 on the PortMaster 4. Earlier releases of ComOS support only RIP-1.
ComOS 4.1 and later releases support both RIP-1 and RIP-2 on the PortMaster 4. Earlier releases of ComOS support only RIP-1.
Caution ¯ ![]() Do not use the static netmask table unless you thoroughly understand and need its function. In most circumstances its use is not necessary. Very large routing updates can result from too much use of the netmask table, adversely affecting performance. In most cases it is easier to use RIP-2 or OSPF instead of using the netmask table and RIP-1. Lucent strongly recommends you use OSPF if you require noncontiguous subnets or variable-length subnet masks (VLSMs).
Do not use the static netmask table unless you thoroughly understand and need its function. In most circumstances its use is not necessary. Very large routing updates can result from too much use of the netmask table, adversely affecting performance. In most cases it is easier to use RIP-2 or OSPF instead of using the netmask table and RIP-1. Lucent strongly recommends you use OSPF if you require noncontiguous subnets or variable-length subnet masks (VLSMs).
Note ¯ ![]() Static routes use the netmask table entries that are in effect when the routes are added. If the netmask table is changed, the static route must be deleted from the route table and added again.
Static routes use the netmask table entries that are in effect when the routes are added. If the netmask table is changed, the static route must be deleted from the route table and added again.
Note ¯ ![]() Lucent recommends that you use RIP-2 or OSPF in this circumstance instead of static routes.
Lucent recommends that you use RIP-2 or OSPF in this circumstance instead of static routes.
Command> set Ether0 address 192.168.206. X (for some value of X)
Command> set gateway 192.168.206. Y (where Y points at your gateway)
Command> add netmask 192.168.207.0 255.255.255.224
Command> add netmask 192.168.208.0 255.255.255.224
Command> add netmask 192.168.209.0 255.255.255.224
Command> set Ether0 rip on
Command> save all
Command> set call-check on |off
Note ¯ ![]() The call-check feature is off by default.
The call-check feature is off by default.